Can we create a new user with an expiry date? ✅ Tốt
Thủ Thuật về Can we create a new user with an expiry date? Mới Nhất
Lê Thùy Chi đang tìm kiếm từ khóa Can we create a new user with an expiry date? được Update vào lúc : 2022-12-18 09:20:11 . Với phương châm chia sẻ Kinh Nghiệm về trong nội dung bài viết một cách Chi Tiết 2022. Nếu sau khi Read tài liệu vẫn ko hiểu thì hoàn toàn có thể lại Comment ở cuối bài để Mình lý giải và hướng dẫn lại nha.We all are aware of the most popular command called ‘useradd‘ or ‘adduser‘ in Linux. There are times when a Linux System Administrator is asked to create user accounts on Linux with some specific properties, limitations, or comments.
Nội dung chính Show- 1. How to Add a New User in Linux2. Create a User with a Different trang chủ Directory3. Create a User with a Specific User ID4. Create a User with a Specific Group ID5. Add a User to Multiple Groups6. Add a User without trang chủ Directory7. Create a User with an Account Expiry Date8. Create a User with Password Expiry Date9. Add a User with Custom Comments10. Create a User Login Shell in Linux11. Add a User with a Specific trang chủ Directory, Default Shell, and Custom Comment12. Add a User with trang chủ Directory, Custom Shell, Custom Comment, and UID/GID13. Add a User with trang chủ Directory, No Shell, Custom Comment, and User ID14. Add a User with trang chủ Directory, Shell, Custom Skell/Comment, and User ID15. Add a User without trang chủ Directory, No Shell, No Group, and Custom CommentWhy would you set user account expiry date?Is the expiry date valid?Can we use product after expiry date?What does it mean for account to expire?
[ You might also like: How to Create a Shared Directory for All Users in Linux ]
In Linux, a ‘useradd‘ command is a low-level utility that is used for adding/creating user accounts in Linux and other Unix-like operating systems. The ‘adduser‘ is much similar to the useradd command because it is just a symbolic link to it.
 useradd command examples
In some other Linux distributions, the useradd command may come with a slightly different version. I suggest you read your documentation, before using our instructions to create new user accounts in Linux.
When we run the ‘useradd‘ command in the Linux terminal, it performs the following major things:
- It edits /etc/passwd, /etc/shadow, /etc/group, and /etc/gshadow files for the newly created user accounts.Creates and populates a home directory for the new user.Sets permissions and ownerships to the home directory.
The Basic syntax of the useradd command is:
# useradd [options] usernameIn this article, we will show you the most used 15 useradd commands with their practical examples in Linux. We have divided the section into two parts from Basic to Advance usage of the command.
- Part I: Basic Useradd Commands with 10 examplesPart II: Advance Useradd Commands with 5 examples
Part I – 10 Basic Usage of useradd Commands
1. How to Add a New User in Linux
To add/create a new user, you’ve to follow the command ‘useradd‘ or ‘adduser‘ with ‘username‘. The ‘username‘ is a user login name, that is used by a user to login into the system.
Only one user can be added and that username must be unique (different from other usernames that already exist on the system).
For example, to add a new user called ‘tecmint‘, use the following command.
[[email protected] ~]# useradd tecmintWhen we add a new user in Linux with the ‘useradd‘ command it gets created in a locked state and to unlock that user account, we need to set a password for that account with the ‘passwd‘ command.
[[email protected] ~]# passwd tecmint Changing password for user tecmint. New UNIX password: Retype new UNIX password: passwd: all authentication tokens updated successfully.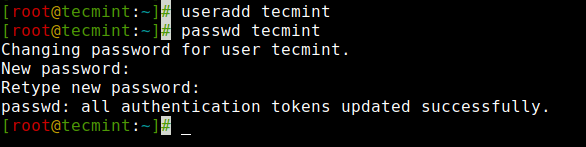 Create a User in Linux
Once a new user is created, its entry is automatically added to the ‘/etc/passwd‘ file. The file is used to store the user’s information and the entry should be.
tecmint:x:1000:1000:tecmint:/home/tecmint:/bin/bash View User Info in Linux
The above entry contains a set of seven colon-separated fields, each field has its own meaning. Let’s see what are these fields:
- Username: User login name used to login into the system. It should be between 1 to 32 characters long.Password: User password (or x character) stored in /etc/shadow file in an encrypted format.User ID (UID): Every user must have a User ID (UID) User Identification Number. By default, UID 0 is reserved for the root user and UIDs ranging from 1-99 are reserved for other predefined accounts. Further UIDs ranging from 100-999 are reserved for system accounts and groups.Group ID (GID): The primary Group ID (GID) Group Identification Number stored in the /etc/group file.User Info: This field is optional and allows you to define extra information about the user. For example, the user’s full name. This field is filled by the ‘finger’ command.trang chủ Directory: The absolute location of the user’s home directory.Shell: The absolute location of a user’s shell i.e. /bin/bash.
2. Create a User with a Different trang chủ Directory
By default ‘useradd‘ command creates a user’s home directory under /home directory with a username. Thus, for example, we’ve seen above the default home directory for the user ‘tecmint‘ is ‘/home/tecmint‘.
However, this action can be changed by using the ‘-d‘ option along with the location of the new home directory (i.e. /data/projects). For example, the following command will create a user ‘anusha‘ with a home directory ‘/data/projects‘.
[[email protected] ~]# useradd -d /data/projects anusha [[email protected] ~]# passwd anushaYou can see the user’s home directory and other user-related information like user id, group id, shell, and comments.
[[email protected] ~]# cat /etc/passwd | grep anusha anusha:x:1001:1001::/data/projects:/bin/bash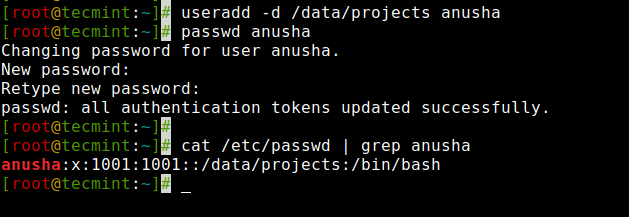 Create a User with trang chủ Directory in Linux
3. Create a User with a Specific User ID
In Linux, every user has their own UID (Unique Identification Number). By default, whenever we create a new user account in Linux, it assigns userid 500, 501, 502, and so on…
But, we can create users with custom userid with the ‘-u‘ option. For example, the following command will create a user ‘navin‘ with custom userid ‘1002‘.
[[email protected] ~]# useradd -u 1002 navinNow, let’s verify that the user created with a defined userid (1002) using the following command.
[[email protected] ~]# cat /etc/passwd | grep navin navin:x:1002:1002::/home/navin:/bin/bash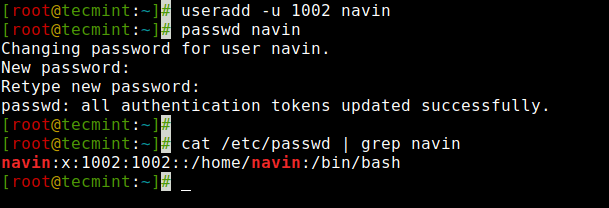 Create a User with the User ID in Linux
NOTE: Make sure the value of a user ID must be unique from any other already created users on the system.
4. Create a User with a Specific Group ID
Similarly, every user has their own GID (Group Identifier). We can create users with specific group IDs as well with the -g option.
Here in this example, we will add a user ‘tarunika‘ with a specific UID and GID simultaneously with the help of ‘-u‘ and ‘-g‘ options.
[[email protected] ~]# useradd -u 1005 -g tecmint tarunikaNow, see the assigned user id and group id in the ‘/etc/passwd‘ file.
[[email protected] ~]# cat /etc/passwd | grep tarunika tarunika:x:1005:1000::/home/tarunika:/bin/bashTo verify the user’s GID, use the id command:
[[email protected] ~]# useradd tecmint0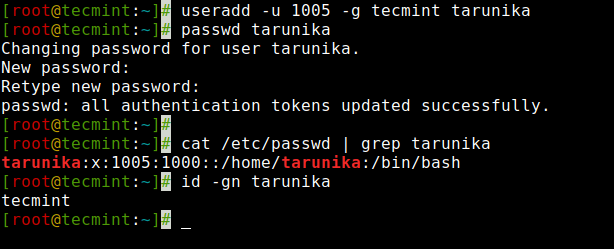 Create a User with Group ID in Linux
5. Add a User to Multiple Groups
The ‘-G‘ option is used to add a user to additional groups. Each group name is separated by a comma, with no intervening spaces.
Here in this example, we are adding a user ‘tecmint‘ into multiple groups like admins, webadmin, and developers.
[[email protected] ~]# useradd tecmint1Next, verify that the multiple groups are assigned to the user with the id command.
[[email protected] ~]# useradd tecmint2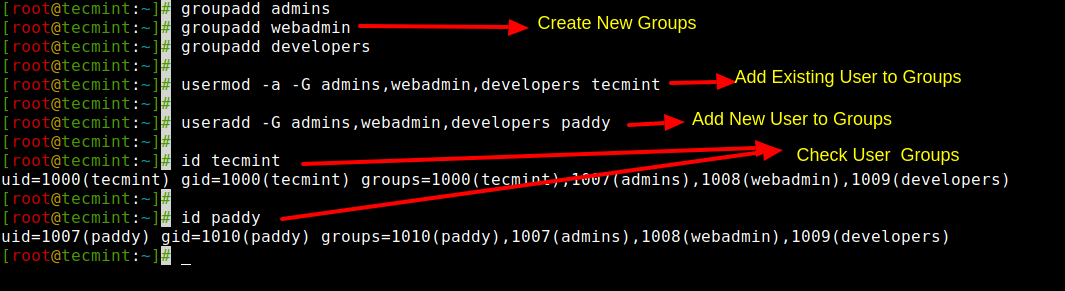 Add User to Group in Linux
[ You might also like: How to Add or Remove a User from a Group in Linux ]
6. Add a User without trang chủ Directory
In some situations, where we don’t want to assign home directories for a user, due to security reasons. In such a situation, when a user logs into a system that has just restarted, its home directory will be root. When such a user uses the su command, its login directory will be the previous user’s home directory.
To create users without their home directories, ‘-M‘ is used. For example, the following command will create a user ‘shilpi‘ without a home directory.
[[email protected] ~]# useradd tecmint3Now, let’s verify that the user is created without a home directory, using the ls command.
[[email protected] ~]# useradd tecmint4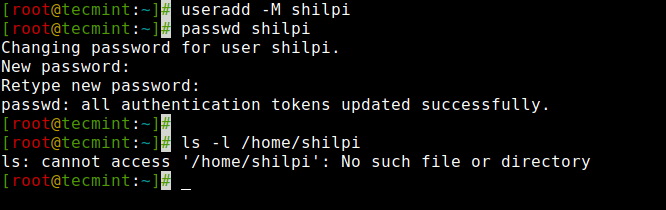 Create User Without trang chủ Directory in Linux
7. Create a User with an Account Expiry Date
By default, when we add user’s with the ‘useradd‘ command user account never get expires i.e their expiry date is set to 0 (which means never expired).
However, we can set the expiry date using the ‘-e‘ option, which sets the date in YYYY-MM-DD format. This is helpful for creating temporary accounts for a specific period of time.
[ You might also like: How to Manage User Password Expiration and Aging in Linux ]
Here in this example, we create a user ‘aparna‘ with an account expiry date i.e. 27th August 2022 in YYYY-MM-DD format.
[[email protected] ~]# useradd tecmint5Next, verify the age of the account and password with the ‘chage‘ command for user ‘aparna‘ after setting the account expiry date.
[[email protected] ~]# useradd tecmint6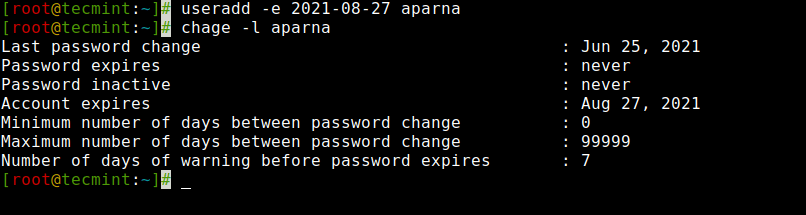 Create User With Account Expiry Date
8. Create a User with Password Expiry Date
The ‘-f‘ argument is used to define the number of days after a password expires. A value of 0 inactive the user account as soon as the password has expired. By default, the password expiry value set to -1 means never expires.
Here in this example, we will set an account password expiry date i.e. 45 days on a user ‘mansi‘ using ‘-e‘ and ‘-f‘ options.
[[email protected] ~]# useradd tecmint7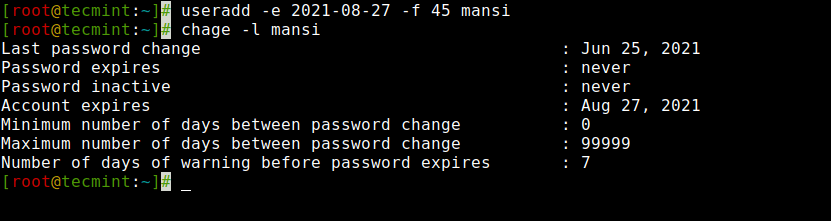 Create User With Password Expiry Date
9. Add a User with Custom Comments
The ‘-c‘ option allows you to add custom comments, such as the user’s full name, phone number, etc to /etc/passwd file. The comment can be added as a single line without any spaces.
For example, the following command will add a user ‘mansi‘ and would insert that user’s full name, Manis Khurana, into the comment field.
[[email protected] ~]# useradd tecmint8You can see your comments in the ‘/etc/passwd‘ file in the comments section.
[[email protected] ~]# useradd tecmint9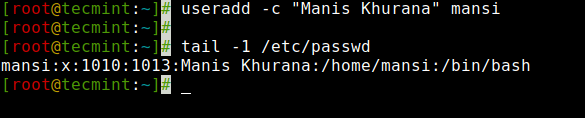 Create User with Full Name
10. Create a User Login Shell in Linux
Sometimes, we add users who have nothing to do with the login shell or sometimes we require to assign different shells to our users. We can assign different login shells to each user with the ‘-s‘ option.
Here in this example, will add a user ‘tecmint‘ without a login shell i.e. ‘/sbin/nologin‘ shell.
[[email protected] ~]# passwd tecmint Changing password for user tecmint. New UNIX password: Retype new UNIX password: passwd: all authentication tokens updated successfully.0You can check the assigned shell to the user in the ‘/etc/passwd‘ file.
[[email protected] ~]# passwd tecmint Changing password for user tecmint. New UNIX password: Retype new UNIX password: passwd: all authentication tokens updated successfully.1 Create a User with Login Shell
Part II – 5 Advance Usage of useradd Commands
11. Add a User with a Specific trang chủ Directory, Default Shell, and Custom Comment
The following command will create a user ‘ravi‘ with home directory ‘/var/www/tecmint‘, default shell /bin/bash and adds extra information about the user.
[[email protected] ~]# passwd tecmint Changing password for user tecmint. New UNIX password: Retype new UNIX password: passwd: all authentication tokens updated successfully.2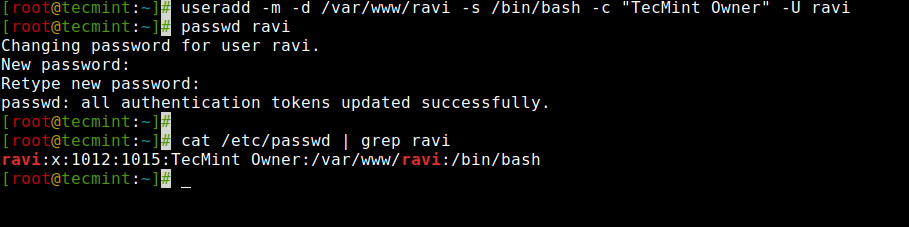 Create a User with trang chủ Directory and Login Shell
In the above command ‘-m -d‘ option creates a user with a specified home directory and the ‘-s‘ option sets the user’s default shell i.e. /bin/bash. The ‘-c‘ option adds extra information about the user and the ‘-U‘ argument creates/adds a group with the same name as the user.
12. Add a User with trang chủ Directory, Custom Shell, Custom Comment, and UID/GID
The command is very similar to the above, but here we define shell as ‘/bin/zsh‘ and custom UID and GID to a user ‘tarunika‘. Where ‘-u‘ defines the new user’s UID (i.e. 100) and whereas ‘-g‘ defines GID (i.e. 1000).
[[email protected] ~]# passwd tecmint Changing password for user tecmint. New UNIX password: Retype new UNIX password: passwd: all authentication tokens updated successfully.3 Create a User with UID and GID
13. Add a User with trang chủ Directory, No Shell, Custom Comment, and User ID
The following command is very much similar to the above two commands, the only difference is here, that we disabled the login shell to a user called ‘avishek‘ with a custom User ID (i.e. 1019).
Here ‘-s‘ option adds the default shell /bin/bash, but in this case, we set a login to ‘/usr/sbin/nologin‘. That means user ‘avishek‘ will not able to login into the system.
[[email protected] ~]# passwd tecmint Changing password for user tecmint. New UNIX password: Retype new UNIX password: passwd: all authentication tokens updated successfully.4 Create a User with UID and Nologin
14. Add a User with trang chủ Directory, Shell, Custom Skell/Comment, and User ID
The only change in this command is, we used the ‘-k‘ option to set the custom skeleton directory i.e. /etc/custom.skell, not the default one /etc/skel. We also used the ‘-s‘ option to define different shells i.e. /bin/tcsh to user ‘navin‘.
[[email protected] ~]# passwd tecmint Changing password for user tecmint. New UNIX password: Retype new UNIX password: passwd: all authentication tokens updated successfully.5 Create a User with Shell and UID
15. Add a User without trang chủ Directory, No Shell, No Group, and Custom Comment
The following command is very different than the other commands explained above. Here we used the ‘-M‘ option to create a user without the user’s home directory and the ‘-N‘ argument is used that tells the system to only create a username (without group). The ‘-r‘ argument is for creating a system user.
[[email protected] ~]# passwd tecmint Changing password for user tecmint. New UNIX password: Retype new UNIX password: passwd: all authentication tokens updated successfully.6 Create a User with NoLogin and Group
For more information and options about useradd, run the ‘useradd‘ command on the terminal to see available options.
Why would you set user account expiry date?
A2: Password expiration and account expiration are two different means to achieve the same goal, that is to prevent someone to log in.Is the expiry date valid?
An expiry date is not the same as a best before date. These dates are required on certain foods that have specific nutritional compositions that could falter after the determined expiration date. In other words, after the expiration date has passed, the food may not have the nutrient content as described on the label.Can we use product after expiry date?
Medicines have expiry dates so you know when to use them by. After the expiry date medicines may not be safe or as effective. You should not take medicines after their expiry date. If you've had a medicine for a while, check the expiry date before using it.What does it mean for account to expire?
Account Expiration is an Account Restriction to indicate that a Digital Identity is no longer able to be used beyond a given date. Tải thêm tài liệu liên quan đến nội dung bài viết Can we create a new user with an expiry date?